Friday, March 16, 2018

Sewing Tip! Reusing Scrap Batting

Sometimes, you just need a LITTLE bit more batting, for a small project... Or a large one! I'll show you how to piece together scrap pieces of batting to make one usable piece! This is a tip I learned a few years ago, and it has saved me SO many trips to the store!


On another project I am working on, I needed eight 9x9 squares of batting. (The soft stuff int he middle of projects, that no one sees.) I fell short of 2 squares while cutting out my batting. Luckily! The chunk of batting I was cutting from gave me some large scraps! Here's how to sew them together!

First you will need some scrap pieces. 


Next you will need to make sure that at least ONE side on each piece is perfectly straight!
(This is IMPORTANT!) 


Next, go to your sewing machine, and find your zig-zag stitch.
On my machine, it's the number 4 stitch. 


Next, I set my machine to make the zig-zag WIDER.
My machine goes up to 7 on this setting, but 6 is enough.
The top number (1.4), is how LONG the stitch will be. That's not super important in this case. 


Next, place your two pieces together under the machine, lining up the middle with the center of the presser foot (The part that holds down your fabric as you sew)


Next, just sew down! Be sure to keep the two pieces close together, and that each stitch goes over both pieces, to bind them together. 


You should have one flat piece of batting now! 
Just trim it up to the size you need! 


"What if my scrap pieces are completely different sizes?"
Great question! For my next square, I had to get a scrap piece of batting from my "stash"
First, do a quick measure to make sure you will be able to get what you need out of it.
I cut it close on this one, haha! 


First, I trimmed it so that it would be the same length as the larger piece. 


Next, I trimmed a bit off the smaller piece to make sure it was perfectly straight.
If one or both of them are wavy, not straight, you wont be able to put them flat against each other under the sewing machine. 


And that's it!! I will show you what I did with my squares next Friday!

Was this tip helpful to you?
Visit my Facebook page for more blogs!
I post food blogs every Monday and craft blogs every Friday!


Friday, March 9, 2018

Curtain Holders! - Super Easy


After I made these particular curtain holders, I thought of 100 other ways to make them! So, I will have to make a separate blog covering those. This one blog  is long enough, just showing this one technique.

Supplies:

  • Basic sewing supplies (Sewing machine, Ruler, Rotary cutter, scissors) 
  • Velcro (There is a specific kind safe for sewing machines, just read the package)
  • Fabric (One fat quarter is perfect for one set)
  • Batting (Optional! Only necessary if your fabric is thin/ light colored) 

I used yardage for this project. I don't recommend going out and buying yards of fabric for this project. I am using this so it will match another project I am making for my nursery :) 


I cut one 3" strip off of my yardage.
If you are using a fat quarter, you can get away with 4.5" so you use the whole piece of fabric. 


Since mine was one long strip, I just use scissors to cut it in half. 


Trim up the ends, to make sure the salvage (words printed on the fabric) aren't showing. 
I allowed some of the words, because I knew I would be sewing over them. 


No matter your source of fabric choice, you need 4 strips of fabric to make these! 
Mine measured 3" x 11" 
I recommend 4.5" x 14" if you are using a fat quarter though! 
I regret not being able to make my strips bigger. but I was working with what I had. 


OPTIONAL!
If you chose a white/light fabric like I did, you might want to put a layer of batting in between. 
The next few steps show how to do that. 
But, the first time I made these (last year) I didn't use any batting, and they turned out great. 


If you are using batting, place one strip of fabric on top of the batting. 
You only need two of your fabric strips for this part. 
You have the option of just basting around the edge , or quilting the batting down. 
(Pictured: Top strip - Sewn around the edge.
Bottom strip - Quilted to the batting) 


I decided to quilt mine. 
Note: You should only be sewing through one piece of fabric and one strip if you are doing this step. 
(Don't worry about my pen marks, they are special pens that the ink disappears with the iron) 


Velcro! 
There are many different kinds at the store. 
We will be securing these to the fabric by sewing them down, so make sure your package says
"Sew on Velcro"
If you use the sticky kind, it will gum up your sewing machine if you try to sew through it. 


Because my strips were 3" wide, I know the final product will finish at 2.5 inches. 
I cut two pieces of Velcro at an 1.5 each. 
You just need to make sure they are shorter than the width of your strips, with a little extra room. 


Pin or glue your Velcro down, giving space to sew around the edges. 
(You can see on the bottom piece, I did not listen to me) 
If you decide to glue it down, only use glue that is safe for sewing machines! 
There is a technique you can use Elmer's glue, but it involves an iron and VERY little glue. 
I'm trying to keep this as beginner friendly as I can :) 


(You can really see how thin my fabric was in this picture!)
Next! Sew the Velcro down.
You can do a box with an X through, it, but I only did the outside of the Velcro. 
Put the other half of the Velcro, on the opposite side of the other two strips. 


Place one fabric strip on top of another, making sure the Velcro is on opposite sides. 
They should be "Right sides together" Or Pretty sides facing one another. 
After we sew around, we will be turning them right side out. 
So leave a hole to turn on the long side, like pictured above. 


After you have sewn all the way around, clip your corners to reduce bulk, and get a clean corner.
(Do not cut through your stitches!!) 


Use the gap you left for yourself to turn them right side out. 
Then take them to the iron, to flatten out. 


We will close the hole we used to turn them out by top stitching all the way around the strip.
(Top stitching is just sewing on top of layers, where you can see them) 

And you are done!!
These are reversible! I didn't just quilt one strip. 
Pictured above is the front and back of the strip. 


I wish mine were a bit longer, but they got the job done!


Here are the ones I made last year. 
These didn't have any batting in them, and I believe the strips measured around
4.5" x 14" 


I love opening all the curtains in the morning, and letting the sun in. 
It really gets me motivated!! 

Let me know if you make these! 
I would love to see them!! 
Just post them on my page!


Saturday, January 20, 2018

Super Easy Burp Cloths

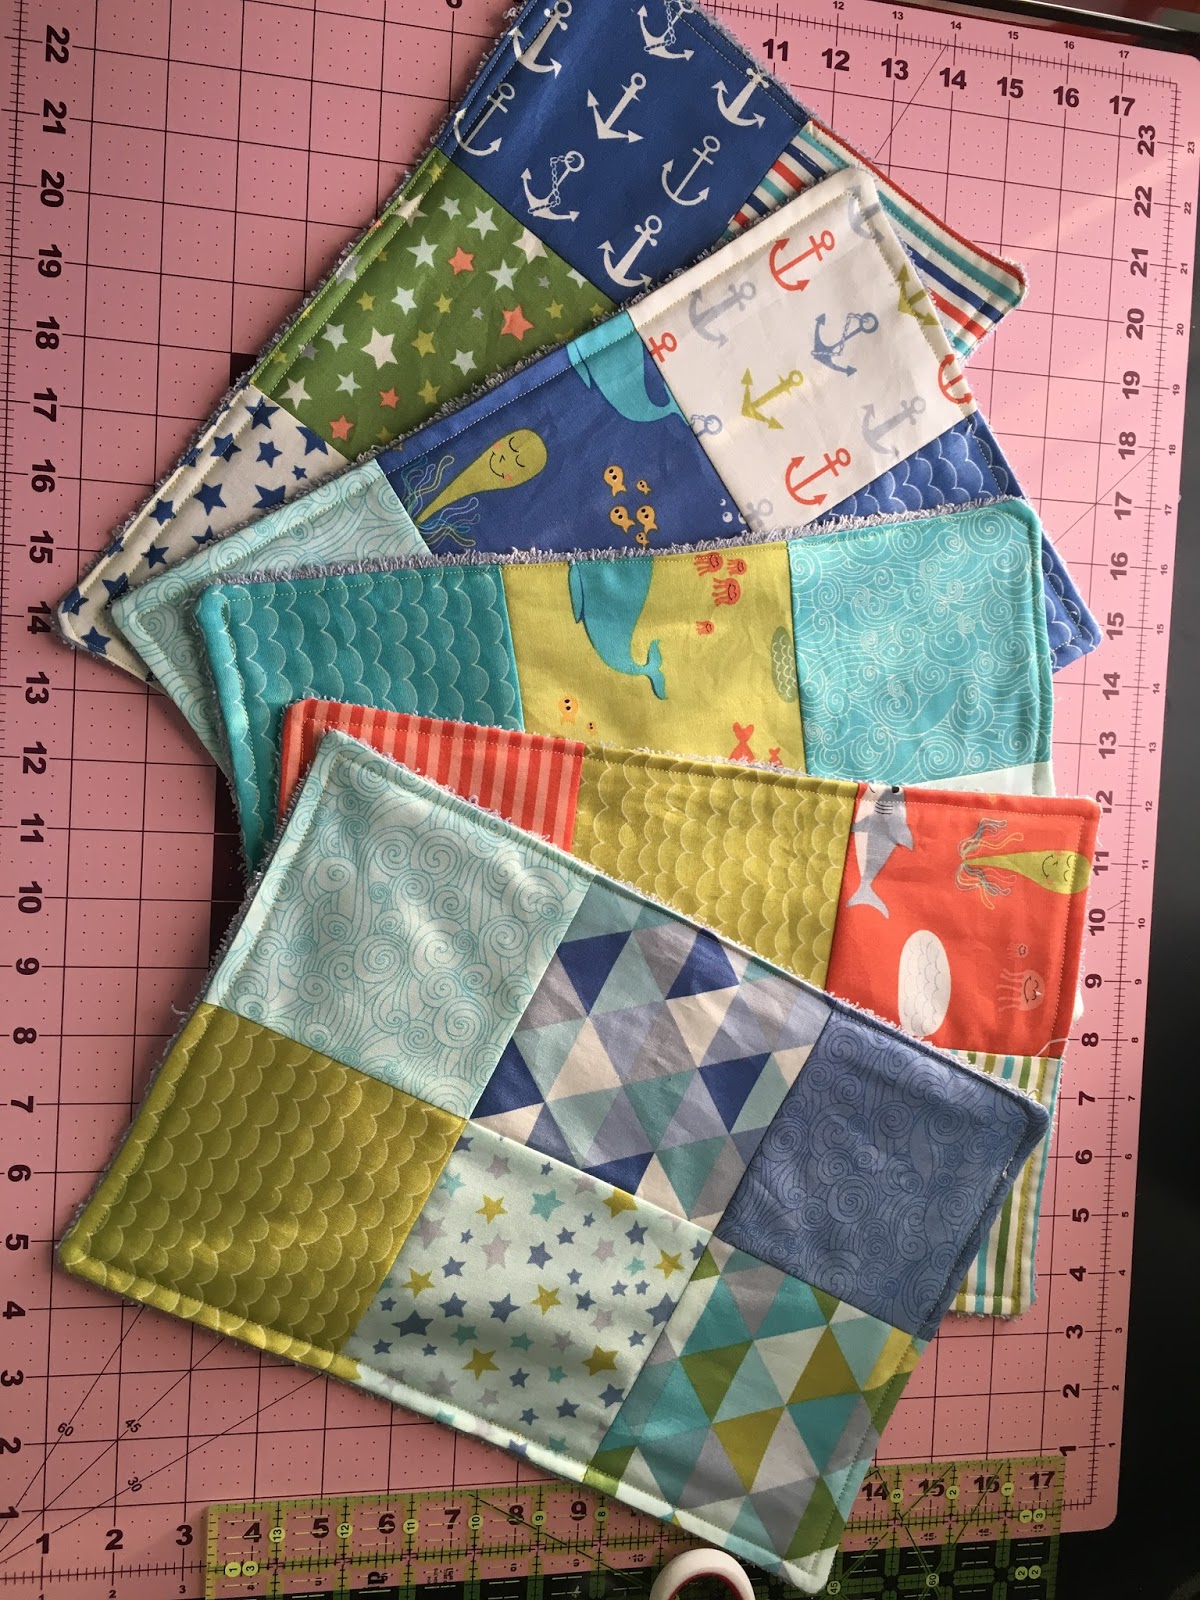
This is one of my favorite go-to projects for when I need a gift and fast! I started making these about 2 years ago when we started trying for the first time. Make some for yourself OR a gift!
These are sew easy even YOU can do it, haha. 
All you need is:
  • Any fabric. Scrap, or pre-cut squares.
  • An old clean towel. You can buy brand new if you HAVE to. 
  • Basic sewing supplies- (Machine, thread, scissors, iron)  
  • About an hour of time (Or less for experienced sewers!) 


I got five burp clothes out of this one towel. But your results will vary depending on how big of a towel you use, and how narrow/wide you decide to make your burp cloths. The time it takes to makes these will also vary depending on how many you need to do. It took me about an hour and a half to make five of them, with a snack break in between. 

Here are the ones I made a few years ago! For these I just cut out a 6" x 16" rectangle. 

 Just a rectangle and some terry cloth. It really is that easy!


 I didn't take any pictures of me sewing 6 squares together... I hope you don't mind.
After sewing a few tops together, I laid them face down on the towel to see how many I could get. 


You can pin your rectangles to the towel at this point if you would like.
A responsible/smart sewer would. Thus, why I didn't... Yet!
Then, all you need to do is cut them out. I highly recommend making sure there is more towel than fabric. This will make for easier sewing later. So, don't cut the EXACT amount of towel out. 


The next step is to struggle to get off of the floor because you are 24 weeks pregnant and didn't think this through. That step is optional.
In the picture below I have pinned the fabric to the towel and drawn two marks on the right.


These marks will tell us when to start/stop sewing. This will give us a hole to turn our project inside out. I drew my lines with a Frixon pen (removes with heat) You can also, just use 2 pins like below. 


After you have sewn all the way around, you will need to trim up a bit. Trim your corners for less bulk , and trim the sides from where we made our towel rectangle bigger than our fabric.
IMPORTANT: I did not trim the side where we marked. I do this with any project I have to turn inside out because it makes it easier to tuck the fabric in after you turn it out. You'll see! 


Now we just need to iron it after you have turned it and gotten the corners out. 


Back to the sewing machine! Sew about 1/8 of an inch along the whole project. This will seal up the hole we made earlier. Also. Anytime a project says 1/8 of an inch... That usually just translates to
"As close as you can comfortably get it."


You can stop here if you want!!
Though, sometimes I like to sew around one more time for a double stitch look. I think it looks nice.

FYI: I ended up getting impatient and only doing this to ONE of them.
If you have a twin needle, and are comfortable using it.... Then this will not effect you. 


We did it! They are done! Let me know if you make one! I would love to see!
Feel free to ask me any questions, I love to troubleshoot!
Share your pictures/questions here!


Wednesday, August 6, 2014

Advice for Cutting Fabric! -Part Four!

Welcome to Part four in our 'How to Quilt Just About Anything' series. I know everyone is eager to throw some fabric underneath their sewing machine! There is only one step left before sewing, cutting! Cutting fabric is one of the most fun parts about sewing, I like to think. I love it! There is so much to go over, I hope I don't forget anything! Leave a comment below if you know something I have forgotten. This is a big subject, and I wont take any offense to a little help :)

1) When it comes to quilting, rotary cutters are a MUST. There is a lot of math, and fractions in quilting, so making precise cuts and measures number one on your list. When it comes to sewing, scissors are fine, and rough edges can be sorted out under the sewing machine. With quilting though, sewing a straight and even line is important. 


 To see an old example of scissors vs rotary, take a look here: This is the very first thing I put under my sewing machine. I had no intention of making a project, I just wanted to sew stuff together to test out the machine.

This is a very old picture, but this is also one of the very first things I put under my sewing machine, except I used a rotary cutter and a ruler. Again, no project intended, I just wanted to sew stuff together. Though this ended up in a birthday box mailed to my mom as a pillow. My aunt has it for safe keeps now.
2) Your second best friend is a cutting mat. They come in LOTS of different sizes and prices. For more than a year, I used a very small, cutting mat, with no problem at all! I cut large and small fabric on it. With large fabric, you just have to fold it up a few more times, and be a lot more careful. Though you really only need one, I use three cutting mats. I recommend getting the largest one you are able to get for your money, and available space.

I use my large 36" mat, for pretty much everything. It stays on my table as one of the best birthday presents I have gotten from my mother-in-law. The smaller mat on the left, is the one I bought myself when I started quilting, it has been through a lot! It was useful for sewing wherever I had the space in my apartment; desk, table or floor! The third one, on the right, is a rotating mat, I only recommend this mat if you plan to test out different shapes of rulers, or like working with small pieces. The idea behind it, is that you never have to pick up the fabric to cut, you move the mat instead.

3) You only REALLY need just ONE good ruler. Although, I have collected many. In the beginning I used a plastic ruler with my rotary cutter. Did you know rotary cutters are sharp enough to slice through thin plastic? They do over time! So I used a regular school ruler that was metal on one side, and I continue to use that ruler every now and then. My favorite ruler of all time, has GOT to be my 24" x 6" ruler. It is large enough to cut through large yardage and is the length of my cutting mat. Though the ruler you see most often in my blogs is always my 18" x 2" ruler. Small enough for small fabrics, but large enough to cover most medium sized things.
 Now, that you know the three things you need to cut with, let's get cutting! On this small mat here, I have the fabric folded so we can see the numbers. The less layers you have to cut through , the better, but sometimes you have to work with what you have! I did it this way for a long time.
 For smaller mats, stick to smaller rulers. :)
 4) You need somewhere to start: a straight edge. If there isn't a single edge you trust on your fabric as perfectly straight; there is a method, fold it. A fold is a guaranteed straight line! In this picture you can see I have it folded on a bold line. I decide how much to trim off, just by rounding down. In this case, I lined my ruler with the number 9 on top and bottom of the mat. This was only to trim off the uneven edges, and have a straight line to work with.  The whole reason we trim, is that fabric usually comes with uneven angled edges.


 5)There is a 'rule of thumb' to never cut past your hand. Part of cutting, is using your hand to put a little pressure on the fabric, to keep it from moving. There are a lot of rulers that help secure fabric under the ruler, but I always do this for added reassurance.

 You can either stop cutting and move your hand, or just 'walk' your hand up the ruler as you cut. I prefer to pause my cutting hand, while the left hand moves up.

 This assures a clean cut, the whole way through.
 6) Now that we have one clean side, you can choose to do the other side at this time too. You can pick up the fabric and align the straight edge on a bold line on your mat and trim the same way.
 If you have a large cutting mat, you could also just move your ruler over to the other side, and trim.  I chose to do neither. I just cut the strips that I needed from the right side. I left the left side unclean and put it back in my fabric drawer for another time.
7) Now lets talk about cutting fabric that is already sewn together. For this project, I needed to cut my strips in pieces. A few tips here:
First I had to chose which side looked the straightest after sewing. The green looked best. So I lined the green with a bold line on my board.
Then, I needed to trim the edges because the brown was longer then the green.
8) It's okay to use a big ruler to cut small things, but the closer to size you use to your project, the better control you will have over your results. So I put a few rulers next to it, to see which one was the closest size. I ended up going with one of my oldest rulers, the blue one that is on it.

9) When we talked about Ironing We talked about putting the 'seam' to one side.  Now, for a quarter of an inch (Or how ever much 'seam allowance' you used) There are three layers of fabric in that tiny spot. So  you need to put just a little extra pressure with your cutting hand over those bumps, to cut all the way through it.

 Here I have a small ruler that I can control with one hand, and I am using the marks on my board to measure what I cut. Remember to always cut AWAY from your body/hand! ( My index finger is a little too close, but I'm a 'pro' :)
 10)Cutting through more than 4 layers may seem like a super quick way to get things cut, but it has it's consequences:
 In the above picture I cut through six layers, and the result: an uneven strip. This doesn't look too bad, but depending on your project, a quarter of an inch can make a HUGE difference! I kept this strip because the mistake was smaller than my seam allowance, and wouldn't be noticed...this time!


A few miscellaneous tips:

If you decide you don't like cutting, there are lots of different pre-cut fabric out there.

You don't have to throw your rotary cutter away, you can buy new blades, or even invest in a blade sharpener.

If you notice that your rotary cutter is missing spots often when cutting, it may be time to change the blade.

Try to cut every thing you need in the beginning of your project before you begin sewing, to save time.

If you have any questions of comments feel free to comment below! I would love to answer questions, or even take requests :)